
I absolutely love doing these! They are so easy and they do not need to be perfect. This is a great beginner’s project.

a total of 2 yards of fabric (for this project I have used 1 yard of each color).If you want to use batting you will need about one yard.
 You can use flannel or any domestic fabric.You can use old flannel shirts, dresses, sheets…anything!Choose any amount of colors you’d like, you can even just use one color!
Do not pre-wash.
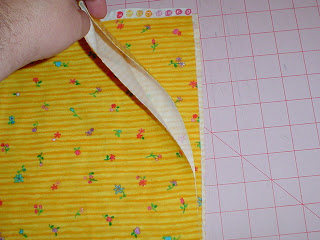 Fold the fabric in half, holding salvage ends to the top, then fold again.Cut every 8 inches.
 Take each 8 inch strip just cut, and cut again into 8 inch squares.I know I have 2 different fabrics showing,but you will do this with all of your fabric.
Quilting rulers and a rotary cutter make this very easy and fast,
but you can do it with a ruler and scissors too.
 If you choose to use batting, any type of batting will work.This is another good reason to save your scraps, even of batting.Cut your batting into 6″ squares.
Place the batting in the center of an 8″ square,
with right side of flannel square being face down.
Place another 8″ square on top of the batting,
like a sandwich.
If using more than one color,
you will need to figure out before hand
which colors you want to back which color.
Because this is for a baby I chose not to use batting.
 Using straight pins, place one pin on two opposite sides of your square.Pin though both pieces of the 8″ squares.
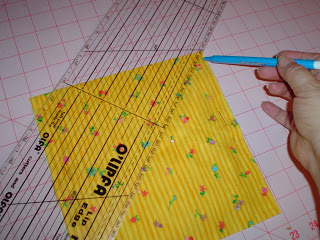 Using a ruler and an erasable marker,draw a diagonal line from corner to corner.
 Then draw another line in the opposite corners to make an X.You can skip these two steps if you think you can ‘eye’ sewinga straight line to make your X.
Sew a straight line on each of your marks to make an X.
You can use a straight stitch, a zigzag or
any decorative stitch you’d like.
You may use thread that blends in well or one that really stands out.
 After all your X’s are sewn in (this is your actual quilting),you need to lay your squares out and see how you want to put them together.I chose to alternate squares to give this a patchwork look.
 Take your first 2 squares andusing a 1/2 inch seam, sew a straight stitch.You will want to
make sure your seams are facing up toward you
(opposite of any other type of sewing you do).
DO NOT PRESS.
 After you sew your rows together,you will go through and sew your columns together.Remember to keep your seams facing upward.
 After all of the squares are together,
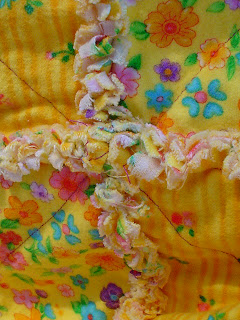
using a 1/2 seam,sew a straight stitch all the way around your whole quilt. Use your scissors to clip about 3/4 of the way down on all of the seams,
including the outside seams.
You need to make your clips about 1/4″ apart.
If you clip too far apart, it will not ‘fray’ well.
Be careful not to cut into your seams.
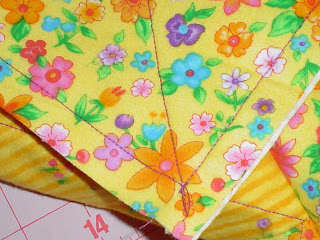
 This is what the back side of your quilt should look like.
After all of your seams are clipped,
run the quilt through the rinse cycle and then dry it.
This is what gives it the ragged look.
Be sure to clean your lint trap after doing this,
it will be full!
If you do a rag quilt larger than a baby quilt
you may want to take it to the laundry mat to wash and dry for the first time.
…
Learn How to Make a Patchwork Quilt
(1).jpg)
Buy Now $21.97!

…
THE BUNDLE

Save $15.00 when you buy all three DVDs!
$65.91
$50.91
and FREE SHIPPING until Dec 15th.
—
KiM Matlock says:
I can’t wait to try this!
Elizabeth says:
WASH THESE AT THE LAUNDROMAT the first time!! I have friends who have created huge repair bills for themselves by clogging up their washers with these things. It’s worth the hour or so at the laundromat, and the few dollars to wash there, to keep your home washer/dryer from needing repairs.
Some of my friends have used 3 layers of flannel. They say the cheap flannels “shag” better… good news for us, right?! If you have flannel scraps, these look cute with the “scrappy” look. If you have an embroidery machine, you could put designs on some of the flannel squares before you sew them together. You could get really fancy and make a simple design on the back with various colors of flannel.
Kathy says:
Yes, Elizabeth, as I stated in the tutorial the first washing needs to be done at the laundry mat. I have washed several baby size (24×24″) in my machine at home with no problems. Anything larger needs a big, strong machine, and dryer!
True, the chap fabric makes GREAT rags! ;o)
Tabitha says:
Not sure how to do the outer edges of the quilt. Are they frayed too?
Kathy says:
Yes, sew a 1/2″ seam all the way around and snip it like you do the rest of the blocks.
Pingback/Trackback
Teaching Good Things » You’re Never to Old to Learn
Lizzie says:
Awesome:) I saw this idea in a magazine and their directions were not very clear;).
May inspire me to get out the sewing machine;)
Pingback/Trackback
Pictures from the Rag Quilting Class « Domestic Classes « Homemaking « Teaching Good Things
Pingback/Trackback
Look at 6 year old Mia’s Quilt « Domestic Classes « Homemaking « Teaching Good Things
Pingback/Trackback
Rag Quilt with Bigger Pieces « Quilting « Homemaking « Teaching Good Things
Pingback/Trackback
My First Quilting Adventure « Virginia's Virtues
Pingback/Trackback
Our Rag Quilting Class « Domestic Classes « Homemaking « Teaching Good Things
Becky says:
I was just wondering the total number of squares? It looks like it is 5X5 but I just wanted to make sure
Kathy says:
You can do 20 or 25.
Janet says:
I was curious about not using batting for a baby quilt. I have always used a thin batting (Warm & Natural which is pricey!).
Will it be too thin to not use a batting of any kind? I just can’t “see” it!
Thank you!
Janet
Kathy says:
Here in the south batting plus 2 layers of flannel would be pretty warm. It’s all a matter of preference.
Laura says:
Hi,
I am using your rag quilt tutorial to make my first quilts! I have cut up my girls’ old baby clothes into 8 x 8 squares, enough to make a big girl twin bed quilt for each of them. Now I have to cut the batting.
I wanted to ask if you think 6 x 6 is the best size for the batting? So there will be a gap between the stitch on either side and the batting, right? Will it show through thinner fabrics (the bulkiness of the batting)? Or is the idea that the hang over from the frayed fabrics will fill this space? I am using Warm and Natural batting, and I understand that I do not need to wash this first. Do you recommend otherwise? Thanks for your help!
Kathy says:
Yes, the 6×6 batting is good for the 8×8 fabric square. And batting is never washed first. Send me a picture when you finish it, I’ll share it with our blog readers.
Laura says:
Where do I send the photo of the twin quilt?
Jennifer says:
I’m planning on making this kind of quilt for a twin bed…..how many yards to you recommend? Could you e-mail me back at [email protected] Thanks!
Kathy says:
4 yards should do it.
angie says:
I’ve never quilted and I’m brand new to sewing in general. Are there specific types of fabric to use for quilts? Thanks for the great tutorial. I’m looking forward to trying it
Kathy says:
Most quilts use 100% cotton. But rag quilts are usually made of flannel.
Diane says:
I have recently made a strip rag quilt for my first time. I am now going to try the squares. I only read about using flannel. Will regular cotton not rag enough?
Kathy says:
Yes it will. Actually, the cheaper the fabric the better it will rag.